 Nederlands
 English
 Great Britain
 Deutsch
 Français
 Svenska
- Home
- Inspiration
- Creating a lighting plan for your garden: 5 steps to the right lighting

Creating a lighting plan for your garden: 5 steps to the right lighting
A good lighting plan for the garden ensures that you can continue to enjoy your outdoor space even after sunset. You use lighting not only to walk safely to the back door, but also to create a cozy atmosphere on the patio or to highlight a special tree. If you decide in advance where lighting is needed, you’ll prevent the garden from becoming too bright or cluttered.
Creating a lighting plan for your garden doesn’t have to be complicated. With a sketch of your garden and five clear steps, you can determine where to place the lights, which fixtures will work best, and how to connect everything. In this blog, we’ll explain how to create your own garden lighting plan.
Summary
A lighting plan starts with a sketch of the garden. Next, determine which areas need functional or atmospheric lighting and choose suitable fixtures. Then, plan the power supply and controls. Finally, test the lighting after dark before installing everything permanently. This creates a garden lighting plan that combines ambiance, functionality, and safety.
Step 1: Create a design for your garden
Start your lighting plan with a simple floor plan of the garden. A professional garden drawing isn’t necessary. Draw a sketch that clearly shows the most important features—that will give you enough to work with. Draw the house, the patio, garden paths, flower beds, trees, fences, stairs, any pergola, and other notable elements.
Next, think about how you use the garden. Which door leads outside? Which routes are taken to the shed? Which elements are visible from the house, and where does the sun shine the longest? This information helps you determine the most important areas and sightlines in your lighting plan.
Tip: Don’t forget to include elevation changes and existing electrical outlets on your sketch. This will give you a complete picture before you start choosing lighting fixtures.
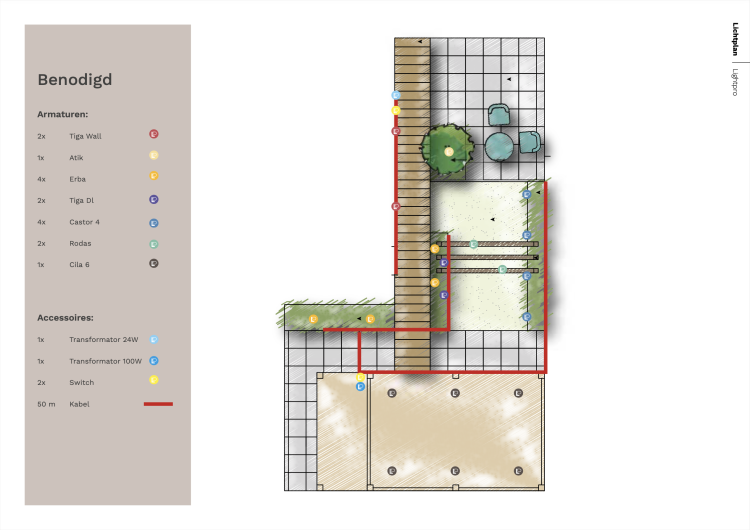
Example of a garden lighting plan
In the image on the right, you can see how lighting is distributed throughout a garden. Use this example primarily as inspiration. After all, every garden has a different layout, plantings, and function. Your own sketch should always be your starting point.
Step 2: Determine where and why you need lighting
Now that you have a plan for your garden on paper, determine which areas need to be visible in the evening. Don’t just consider where you can place a light fixture; focus primarily on the effect you want to achieve. In a garden lighting plan, you’ll distinguish between functional lighting, mood lighting, and accent lighting:
● Use functional lighting in areas where good visibility is important. Think of a garden path, stairs, driveway, or entrance.
● Use ambient lighting around the patio or other seating areas to create a warm atmosphere.
● Accent lighting, on the other hand, draws attention to a specific feature of the garden, such as a tree, a building facade, a work of art, or a water feature.
It’s not necessary to light up the entire garden. Dark areas actually provide contrast and tranquility. For example, a lit tree stands out more when the surrounding area isn’t fully illuminated. By deliberately alternating light and dark, the garden gains more depth.
Step 3: Choose the right garden lighting
Do you know what you want to illuminate? Then it’s time to choose the right fixtures. Different types of garden lighting produce different lighting effects. By combining these effects, you can build your lighting plan layer by layer. Each type of outdoor lighting has its own function:
● Spotlights are ideal for creating shadows and highlighting objects, such as a flower bed, tree, or unique feature. They’re also perfect for illuminating a walkway.
● Uplights give the outdoor space a high-end aesthetic. The lights shine upward from the ground, making them suitable for highlighting walls, fences, and plants.
● Decklights can be subtly integrated into a deck or staircase.
● Wall lights are perfect for illuminating walls, fences, and facades.
● Recessed veranda spotlights are the ideal solution for lighting your porch or canopy in a way that’s both atmospheric and functional.
● Post lights are ideal for lighting paths and driveways.
● Mood lighting makes long evenings in the garden even cozier. Even on colder days, mood lights create a festive atmosphere.
Consider light color and intensity
It’s not just the fixture that determines the result. Light color and intensity also influence the atmosphere. Warm white light (approximately 2700 to 3000 K) creates a warm and relaxed ambiance. Cooler white light (starting at about 4000 K) appears brighter and more functional.
Also consider how much light is actually needed. More light isn’t always better. By using targeted lighting and combining different intensities, you can prevent the lighting plan from feeling flat. Dimmer functions are useful for adjusting the intensity to suit the situation, plant growth, and the living environment of insects.
Step 4: Plan the power supply and controls
A garden lighting plan doesn’t just show where the lights will go. You should also think about the power supply in advance. In Lightpro’s 12-volt system, a transformer converts the 230-volt mains power to 12 volts. A cable runs from this transformer through the garden, to which the fixtures are connected.
One advantage of 12-volt garden lighting is that you can install the system yourself. No electrician is needed, and the cable doesn’t have to be buried half a meter deep in the ground. This makes it easy to expand or modify the installation later on. Install the transformer according to the installation instructions and determine in advance how much power all the selected lights will require combined.
Timers and Sensors
Also consider how you’ll control the system. With timers and sensors, you won’t have to turn the lights on and off manually every evening. For example, the Motion Sensor SMART activates the lights when motion is detected. Depending on the system you choose, you can also have the lights turn on automatically around sunset.
Step 5: Test your lighting plan and adjust it
A lighting plan may look perfect on paper, but you won’t see the actual result until it’s dark. Therefore, set up a test layout before permanently installing all the lights. Place the fixtures in their planned locations and view the result from different angles.
For example, walk from the house to the patio and look outside from the living room. Is the path clearly visible? Is the tree lit properly? Is the lighting around the patio atmospheric or too bright? Also check whether any fixtures are causing glare.
The advantage of a 12-volt system is that you can move fixtures relatively easily. Use that flexibility to further fine-tune the light direction and position. Sometimes, moving a spot light just half a meter can immediately create a different effect.
Be sure to keep the final lighting plan even after the garden lighting has been installed. After all, a garden changes over time. Plants grow taller, trees develop wider canopies, and you might add a new seating area later on. With the original plan on hand, you can easily see where adjustments are needed.
Turn your lighting plan into an evening garden
Would you like help putting together your lighting plan? Use Lightpro’s configurator to further develop your lighting plan. This way, you can determine step by step which lighting suits your garden. Are you having trouble figuring it out, or do you need advice? Please contact us.
Frequently Asked Questions
How do you create a lighting plan for the garden?
First, draw a floor plan showing the main features of the garden. Then determine where functional lighting, ambient lighting, and accent lighting are needed. Choose appropriate fixtures, plan the power supply, and test the lighting after dark before installing everything.
How do you create your own lighting plan?
You can create your own lighting plan by indicating on a sketch which areas and elements you want to illuminate. Think in terms of the desired lighting effect, not just the position of the light fixture. Combine different types of lighting and use a test setup to check if the result is right.
Where can I put together a complete set for a lighting plan for free?
With Lightpro’s configurator, you can put together a complete set for your lighting plan yourself. Choose the areas of the garden you want to illuminate and use the results as a basis for the rest of your garden lighting design.